웹서버 클러스터 배포
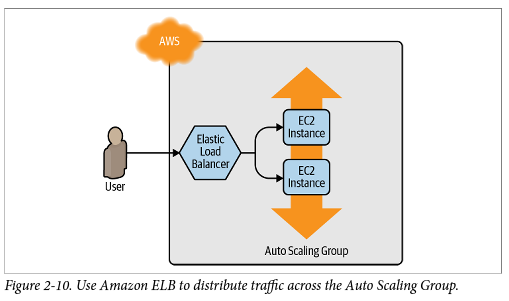
여러개의 인스턴스를 만들어 서버 클러스터 구축 → 개별 인스턴스에 문제 발생시(트래픽 과부하) 다른 인스턴스가 동작하며 다운타임을 줄이고 적절하게 라우팅하도록 하여 안전성을 확보가능

AWS의 ASG(Auto Scaling Group) 서비스 : EC2 인스턴스 클러스터 시작, 각 인스턴스 상태 모니터링, 실패한 인스턴스 교체, 로드에 따른 클러스터 크기 조정 등 많은 작업을 자동으로 처리
(1) 사전에 launch_configuration( launch_template ) 설정 : 각 EC2 인스턴스를 구성하는 방법을 지정 (공통속성에 대한 정의)
resource "aws_launch_configuration" "example" {
  image_id        = "ami-024ea438ab0376a47"
  instance_type   = "t3.micro"
  security_groups = [aws_security_group.instance.id]
  user_data       = <<-EOF
  #!/bin/bash
  echo "Hello, World" > index.html
  nohup busybox httpd -f -p ${var.server_port} &
  EOF
  lifecycle {
   create_before_destroy = true
  }
}
수명 주기 블록 : 삭제이후 만들기
lifecycle {
	create_before_destroy = true
}
Terraform의 기본동작은 이전리소스 삭제 → 대체 리소스 생성 ( 시작구성변경시 새로운 시작구성 생성전에 삭제 ) → 그러나 이를 참조하는 리소스( ASG )의 존재하여 문제가 발생 이에 따라 리소스 교체순서를 반전 : 대체 리소스를 생성후( 참조의 업데이트 포함 ) → 리소스 삭제
(2) 기존의 resource aws_instance를 삭제하고 ASG 그룹 선언( launch_config와 이를 사용하는 autoscaling_group )
⇒ 기존의 인스턴스 생성결과처럼 output public ip는 출력될 수 없음
resource "aws_autoscaling_group" "example" {
 vpc_zone_identifier = data.aws_subnets.default.ids
 launch_configuration = aws_launch_configuration.example.name
 min_size = 2
 max_size = 10
 tag {
  key = "Name"
  value = "terraform-asg-example"
  propagate_at_launch = true
 }
}
- 2~10개의 EC2 인스턴스(초기 시작 시 기본값은 2개)에서 실행, terraform-asg-example이라는 이름지정
- subnet_ids : ASG 인스턴스가 배포되어야하는 서브넷을 지정 여러 서브넷에 인스턴스를 배포하는 속성(vpc_zone_identifier) → 모든 서브넷 목록을 가져옴( 데이터 소스를 로드하여 이용 ) 모든 서브넷에 서버들이 분산되어 생성될 수 있음
** 데이터 소스 : Terraform을 실행할 때마다 공급자(AWS)에서 가져오는 읽기 전용 정보를 나타냄( 리소스 생성X, 존재하는 리소스 )
공급자의 API에서 데이터를 쿼리하고 해당 데이터를 나머지 Terraform 코드에서 사용할 수 있도록 하는 방법
# 데이터 소스 선언
data "<PROVIDER>_<TYPE>" "<NAME>" {
	[CONFIG ...]
}

# 데이터 소스 사용 -> 값을 이용
data.<PROVIDER>_<TYPE>.<NAME>.<ATTRIBUTE>
TYPE : 사용하려는 데이터 소스 유형
NAME : Terraform 코드 전체에서 이 데이터 소스를 참조하는 데 사용할 수 있는 식별자
data "aws_vpc" "default" {
	default = true
}

data "aws_subnets" "default" {
  filter {
    name   = "vpc-id"
    values = [data.aws_vpc.default.id]
  }
}
- aws_vpc 데이터 소스에서 필요한 필터는 default = true → AWS 계정에서 기본 VPC를 조회하도록 지시
- aws_subnets( 여러 서브넷 ) : 소속된 VPC가 default VPC인것으로 필터링 ⇒ 기본 VPC내부의 서브넷들의 모음
provider "aws" {
  region = "ap-northeast-2"
}

resource "aws_launch_configuration" "example" {
  image_id        = "ami-024ea438ab0376a47"
  instance_type   = "t3.micro"
  security_groups = [aws_security_group.instance.id]
  user_data       = <<-EOF
  #!/bin/bash
  echo "Hello, World" > index.html
  nohup busybox httpd -f -p ${var.server_port} &
  EOF
  lifecycle {
   create_before_destroy = true
  }
}

resource "aws_autoscaling_group" "example" {
 vpc_zone_identifier = data.aws_subnets.default.ids
 launch_configuration = aws_launch_configuration.example.name
 min_size = 2
 max_size = 10
 tag {
 key = "Name"
 value = "terraform-asg-example"
 propagate_at_launch = true
 }
}

resource "aws_security_group" "instance" {
  name = "terraform-example-instance"

  ingress {
    from_port   = var.server_port
    to_port     = var.server_port
    protocol    = "tcp"
    cidr_blocks = ["0.0.0.0/0"]
  }
}

variable "server_port" {
  description = "The port. the server will user for HTTP requests"
  type = number
  default = 8080
}

data "aws_vpc" "default" {
  default = true
}
data "aws_subnets" "default" {
  filter {
    name   = "vpc-id"
    values = [data.aws_vpc.default.id]
  }
}


로드밸런서 배포
각각 고유한 IP 주소를 가진 여러 서버들은 일반적으로 최종 사용자에게 사용할 단일 IP만 제공 ⇒ 로드밸런서를 배포하여 외부적으로 사용자에게 하나의 이름( DNS )( 하나의 IP )를 제공 & 내부적으로 서버그룹에 트래픽을 분산
- 전반적인 아키텍처 : LB만 public subnet에 위치시키고 webserver, APserver, DBserver모두 private에 위치시킴( 외부에서 들어오는 client의 요청은 public LB가 처리, vpc내에서는 자유로운 통신이 가능하기에 LB가 webserver에 요청전달 )
- LB는 proxy처럼 동작 downstream의 Listener에서 받을 데이터 설정 & upstream에서 목적지( targetgroup ) endpoint에 대한 설정
- AWS의 세가지 유형 로드밸런서
- ALB : 애플리케이션 계층(계층 7)에서 작동, 도메인기반의 라우팅 & 패스기반의 라우팅 지원( HTTP 및 HTTPS 트래픽 )
⇒ 리스너(Listener) : 특정포트와 프로토콜( HTTP, HTTPS )를 수신
⇒ 리스너 규칙(Listener rules) : 경로 및 호스트 이름에 따라 특정 대상그룹으로 요청 전달
⇒ 대상그룹(target group) : 요청을 수신하는 하나 이상의 서버 - NLB : 전송 계층(계층 4)에서 작동, TCP UDP TLS 트래픽, ALB보다 더 빠르게 로드에 응 답하여 확장 및 축소
- CLB : OSI 모델의 애플리케이션 계층(L7)과 전송 계층(L4) 모두에서 작동, 레거시 모델
- ALB : 애플리케이션 계층(계층 7)에서 작동, 도메인기반의 라우팅 & 패스기반의 라우팅 지원( HTTP 및 HTTPS 트래픽 )

- MSA구현의 필수기능 : service discovery, circuit breaking(회로차단기)
[ 리스너 실습 ]
(1) ALB타입의 로드밸런서 생성
resource "aws_lb" "example" {
	name = "terraform-asg-example"
	load_balancer_type = "application"
	subnets = data.aws_subnets.default.ids
	security_groups = [aws_security_group.alb.id]
}
- 로드밸런서의 이름과 종류를 지정가능
- aws_subnets 데이터 원본을 사용하여 기본 VPC의 모든 서브넷을 사용하도록 로드 밸런서를 구성 ( 모든 서브넷( public )에 LB를 구축 ) ⇒ 모든 서브넷에 걸쳐서 로드 밸런서를 생성하고 트래픽을 수용할 수 있도록 설정
- 전용 보안그룹을 생성하고 적용
(2) LB전용 보안그룹
보안그룹( instance ) : 80포트에서 들어오는 요청을 허용 & health check를 위해 모든 포트에서 나가는 요청을 허용
AWS 리소스는 기본적으로 모든 트래픽을 허용하지 않음 → ALB 전용으로 새 보안 그룹을 생성, 들어오는 모든 IP의 HTTP 요청을 허용( 80포트 ), 나가는 모든 IP의 모든 요청을 허용 ( protocol = "-1” )
resource "aws_security_group" "alb" {
	name = "terraform-example-alb"

	# Allow inbound HTTP requests
	ingress {
		from_port = 80
		to_port = 80
		protocol = "tcp"
		cidr_blocks = ["0.0.0.0/0"]
	}

	# Allow all outbound requests
	egress {
		from_port = 0
		to_port = 0
		protocol = "-1"
		cidr_blocks = ["0.0.0.0/0"]
	}
}
(3) 로드밸런서의 리스너 설정 ( upstream쪽 설정 )
resource "aws_lb_listener" "http" {
	load_balancer_arn = aws_lb.example.arn
	port = 80
	protocol = "HTTP"
	# By default, return a simple 404 page
	default_action {
		type = "fixed-response"
		fixed_response {
			content_type = "text/plain"
			message_body = "404: page not found"
			status_code = 404
		}
	}
}
기본 HTTP 포트인 포트 80에서 수신 대기
리스너 규칙과 일치하지 않는 요청에 대한 기본 응답으로 간단한 404 페이지를 보냄
(4) 타겟그룹 설정 ( downstream쪽 설정 )
- aws_lb_target_group 리소스를 생성하고 health check 설정
resource "aws_lb_target_group" "asg" {
	name = "terraform-asg-example"
	port = var.server_port
	protocol = "HTTP"
	vpc_id = data.aws_vpc.default.id
	health_check {
		path = "/"
		protocol = "HTTP"
		matcher = "200"
		interval = 15
		timeout = 3
		healthy_threshold = 2
		unhealthy_threshold = 2
	}
}
- health check구성
- matcher로 200의 응답만 정상상태로 판단
- healthy_threshold : 문제가 발생하여 차단후 정상화되었을때 정상적으로 판단할 수 있는 성공 임계값
- unhealthy_threshold : 문제발생으로 취급할 수 있는 실패 임계값
- auto scaling group을 사용하여 target group으로 지정할것 ( target_group_arns, health_check_type 설정 : 기본 상태체크 타입 EC2에서 강력한 ELB로 변경 ) 혹은 aws_lb_tar get_group_attachment 리소스를 이용하여 정적 인스턴스 목록을 연결할 수 있음

(5) 리스너 규칙(listener_rule) 생성 : 타켓그룹으로 받아서 forward로 전달
ASG가 포함된 대상 그룹에 대한 경로와 일치하는 요청을 보내는 리스너 규칙을 정의
→ 구현 생략
(+) output으로 alb_dns_name을 출력
output "alb_dns_name" {
 value = aws_lb.example.dns_name
 description = "The domain name of the load balancer"
}
ALB(Application Load Balancer)는 여러 서브넷에 걸쳐 배포될 수 있지만, Terraform에서는 ALB의 DNS 이름(DNS Name)이 하나로 제공됩니다. 이 값은 모든 퍼블릭 서브넷의 ALB 리소스를 대표하는 유일한 접근 지점
여러 퍼블릭 서브넷에 생성된 ALB 리소스는 내부적으로 동일한 DNS 이름으로 관리되며, AWS는 요청을 서브넷에 있는 ALB 노드들로 분산
provider "aws" {
  region = "ap-northeast-2"
}

resource "aws_lb" "example" {
  name               = "terraform-asg-example"
  load_balancer_type = "application"
  subnets            = data.aws_subnets.default.ids
  security_groups    = [aws_security_group.alb.id]
}
resource "aws_lb_listener" "http" {
  load_balancer_arn = aws_lb.example.arn
  port              = 80
  protocol          = "HTTP"
  # By default, return a simple 404 page
  default_action {
    type = "fixed-response"
    fixed_response {
      content_type = "text/plain"
      message_body = "404: page not found"
      status_code  = 404
    }
  }
}

resource "aws_security_group" "alb" {
  name = "terraform-example-alb"
  # Allow inbound HTTP requests
  ingress {
    from_port   = 80
    to_port     = 80
    protocol    = "tcp"
    cidr_blocks = ["0.0.0.0/0"]
  }
  # Allow all outbound requests
  egress {
    from_port   = 0
    to_port     = 0
    protocol    = "-1"
    cidr_blocks = ["0.0.0.0/0"]
  }
}

resource "aws_launch_configuration" "example" {
  image_id        = "ami-024ea438ab0376a47"
  instance_type   = "t3.micro"
  security_groups = [aws_security_group.instance.id]
  user_data       = <<-EOF
 #!/bin/bash
 echo "Hello, World" > index.html
 nohup busybox httpd -f -p ${var.server_port} &
 EOF
 lifecycle {
  create_before_destroy = true
 }
}

resource "aws_autoscaling_group" "example" {
 vpc_zone_identifier = data.aws_subnets.default.ids
 launch_configuration = aws_launch_configuration.example.name
 min_size = 2
 max_size = 10
 tag {
 key = "Name"
 value = "terraform-asg-example"
 propagate_at_launch = true
 }
}

resource "aws_security_group" "instance" {
  name = "terraform-example-instance"

  ingress {
    from_port   = var.server_port
    to_port     = var.server_port
    protocol    = "tcp"
    cidr_blocks = ["0.0.0.0/0"]
  }
}

variable "server_port" {
  description = "The port. the server will user for HTTP requests"
  type = number
  default = 8080
}

data "aws_vpc" "default" {
  default = true
}
data "aws_subnets" "default" {
  filter {
    name   = "vpc-id"
    values = [data.aws_vpc.default.id]
  }
}
terraform apply 를 실행 → LB의 DNS 이름이 출력됨

DNS로 접속시 하나의 서버로 정상접속이 되고 있음!


자원반환
Terraform은 생성한 리소스를 추적하므로 정리가 간단하다
terraform destroy
'CLOUDWAVE' 카테고리의 다른 글
| IaC : Terraform - 테라폼 모듈(module)로 재사용가능한 인프라 구성 (0) | 2025.02.07 |
|---|---|
| IaC : Terraform - 테라폼 상태관리 및 상태파일(tfstate) (1) | 2025.02.07 |
| IaC : Terraform 실습 - 단일 서버배포, 단일 웹서버배포, 구성가능한 웹서버배포 (0) | 2025.02.07 |
| IaC : Terraform - 테라폼 소개, 테라폼 환경 구축 (0) | 2025.02.07 |
| IaC : Ansible 변수관리 및 작업제어 (0) | 2025.02.01 |